The shinkansen is probably the most famous train in Japan and when thinking about Japan, shinkansen will be one of the first things to come to mind.
It's also the fastest and most comfortable way to travel around Japan. It's probably also the most expensive one but the train is always on time.
Getting a ticket is a bit tricky which is mostly because train staff do not speak very good English, if they speak at all. I therefore recommend you come prepared and have the travel information with you so you only have to point.
Basically, the shinkansen covers all major lines throughout Japan from Fukuoka in the southwest to Sapporo in the north east. Along the main line between Osaka and Tokyo, shinkansen departs every other minute.
There are also different kinds of shinkansen and operation lines are split into different regions (i.e. JRWest, JREast) so googling the information is a bit tricky sometimes. Again, if you want to have information about departures, I recommend Hyperdia as it provides you with everything you need to know.
When you buy a ticket, you always buy that ticket for a specific train on a specific date. You buy a ticket for a train, you are bound to use that and only that. There are special ticket gates for the shinkansen and you use it just like any other ticket gate.
Usually when buying a ticket for the shinkansen or another limited express train (there are a few but apps like Hyperdia will tell you that) you also need a seat reservation. There are specific waggons without reservation but they are rare and it's much more comfortable that way.
If you travel long distances as a tourist, you might want to check the JR pass as you can use some types of shinkansen with it as well without having to reserve a seat. But the pass is really expensive so unless you plan on using the shinkansen all the way from Fukuoka to Sapporo, it hardly ever checks out.
But again, using apps like Hyperdia will help you plan your trips and your calculations.
When buying a ticket, you can do so either through a vending machine or the ticket office. As mentioned above, the staff in Japan is usually not very fluent in English, so better provide all your information written down so it's easier for them.
If you already know which trains to take, JREast also offers online reservation:
http://www.eki-net.com/pc/jreast-shinkansen-reservation/English/wb/common/Menu/Menu.aspx
Freitag, 10. Juli 2015
Japan, Tokyo: How to get around
Tokyo provides an extensive and well-build public transport system which is exceptionally easy to use even though it looks very complex.
All trains and subways are run by 3 major operators and some private ones:
JR: http://www.jreast.co.jp/e
Metro Subway: http://www.tokyometro.jp/
Toei: http://www.kotsu.metro.tokyo.jp/
To enter the platforms you need to pass the ticket gate and when exiting the platform at your destination, you pass the ticket gate again. You will then be charged for the distance it took from depature to destination. If you switch train companies throughout your travel, you usually have to pass another ticket gate.
Remember that you will need a ticket for your complete destination. If you have to switch companies, you usually have another ticket vendine machine next to the ticket gate.
More information on how to use the ticket gates are provided here:
http://www.jreast.co.jp/e/ticket/station.html
If you want to use the train and pass the ticket gate, you obviously need a ticket first. You can buy tickets at a ticket vending machine. Most companies provide machines where you can switch to English but smaller ones outside Tokyo might not have those (they might not even have a ticket gate or a ticket vending machine at all).
There are different kinds of tickets, like roundtrip tickets, day tickets or standard tickets.
To buy a standard ticket, you first have to look up how much the trip to your destination will cost you. Usually, there is a huge map above the vending machines providing you with the information.
The tickets work like a prepaid card. So when you buy a ticket you get something like a one time use prepaid card that you charge up with exactly the amount you need to reach your destination.
More information on Fares and how to use those ticket machines are provide here:
http://www.jreast.co.jp/e/ticket/purchase.html
There might be differences on how to use the vending machines between train operator companies but the principle stays the same.
If you stay in the city or in Japan for a while, you might find buying a ticket every time very tiring.
And you don't need to because every operator offers a prepaid card which you can charge with as much as you want. You then just swipe it over the ticket gate and you don't have to worry about how much the fare is.
But remember that you will need to have enough money on your card to travel at least one station or else you won't be able to pass the ticket gate.
You can also recharge your card once you are inside.
All operators provide these prepaid cards but if you plan on leaving Tokyo, I suggest you buy a suica card since that usually works for other operators as well.
Once you passed ticket gate, you need to find the right platform. This seems very complicated at first but once you got the system, all you need to do is follow the right colors:
Every train line usually has its own color. As for Tokyo, sometimes the color changes throughout as the line changes (For example the Hanzomon line) but all lines additionally either have a number or a letter to identify them on the map. They also always have names, like the Yamanote line from JR.
But thanks to the color codes, you only have to follow the right colors to find the right platform. In Tokyo, every line has their own platform so unless the train ends early you will never hop onto the wrong train.
Some stations can be very big, though, so you might need a while to figure out where to go. Also remember once you pass through the ticket gate, you cannot exit it at the same station. Of course there are gates with staff that can help you but not all gates have them.
So before passing the ticket gate make sure it's the right one. Sometimes the stations are so big that not all lines are within the same area so always make sure to follow the colors and numbers.
Maps:
JR: http://www.jreast.co.jp/e/info/map_a4ol.pdf
Metro: http://www.tokyometro.jp/en/tips/guide/pdf/tokyo_metro_guide.pdf
Toei: http://www.kotsu.metro.tokyo.jp/eng/services/pdf/sub_map_eng.pdf
Especially in huge cities like Tokyo, you will have to switch between lines and operators when getting somewhere, so depending on the map alone might not help you much. Some stations are also really big so you need to walk for 10 minutes to change lines.
In that case, you should use an app or a web site that helps you find the best way to travel around:
Hyperdia has helped me a lot in the past. It also provides information about the Shinkansen and has all routes throughout all of Japan. It also tells you how long it takes and how much the fare is.
It's available as an app for Android.
Dienstag, 10. Juni 2014
Korea, Busan: How to get to Taejongdae Resort Park (태종대 유원지)
We had our difficulties finding it because we used the official sightseeing map of Busan which was not helpful at all.
If you look at a map, you will get the impression that the island is mostly nature and forest. In reality it's mostly city apart from the resort park and the hill in the middle. Also it's pretty big so you really do want to either use a car or go there by bus.
More detailed information about the park can be found at the official tourism site of Kora.
The easiest way of getting there is from Busan Station. They are currently rebuilding the area around Busan station so you might need to ask around to find the right bus stop.
You can take the following busses: 66, 88, and 101 with the final stop Chagoji (차고지) and get off at Taejongdae (태종대). It will take 40-45 minutes to get there.
Please note that even though the directions are shown in English on the outside of the bus, neither the bus stop signs nor the station map inside the buses are English so you should definitely learn the Hangul characters or go and ask the bus driver.
Taejongdae is the final stop so just stay seated until the end.
You can take the same buses to get back to Busan station. The bus stop "Busan station" will also be announced in English.
Once you reach the Resort park, you can either walk or take the small train to get you to the sightseeing spots. Please note that the train will only run every other 20minutes and if you get off in the middle and try to get back on, you might have to wait a while.
The train always runs in circles, so no matter where you get off, you always pass all spots.
 |
| Source: http://taejongdae.bisco.or.kr |
The 5 sightseeing spots are:
1. A beach
2. Gumyeongsa temple
3. Observatory
4. Lighthouse
5. Taejongsa temple
You should definitely get off at the lighthouse as you not only have a wonderful view over the sea but you also have access to a beautiful cliff where you can rest a for a while and enjoy the power of the ocean.

Korea, Seoul: How to get to the Coffee Prince café
Today's post is about how to get to the café that was used for the K-Drama Coffee Prince.

It's actually pretty easy to find, if you get the right exit.
The café is located in Hongdae, so you want to go to the Station Hongik University (Subway line 2 (green) and AREX A (light blue)) 홍대입구역.
Once you're at the station, follow these directions:
 Coffees are a bit expensive here but the waffles are really good and before you leave, one of the waiters will take you to the second floor if you want, from where you can take more photos.
Please be advised that you are not allowed to take photos from within the area if you don't order anything.
It's actually pretty easy to find, if you get the right exit.
The café is located in Hongdae, so you want to go to the Station Hongik University (Subway line 2 (green) and AREX A (light blue)) 홍대입구역.
 |
| Source: http://map.naver.com/?menu=route&mapMode=0&lat=37.5564664&lng=126.9272555&dlevel=12&slng=126.9241893&slat=37.5569337&elng=126.9292551&elat=37.5545201&pathType=3&dtPathType=0&sText=7JWE66aE64uk7Jq06rCA6rKM&eText=7Luk7ZS87ZSE66aw7IqkMe2YuOygkA%3D%3D&enc=b64 |
Once you're at the station, follow these directions:
- Take Exit no. 8
- Follow the street to your right.
- At the 5 way intersection walk straight to the end
- Turn left, walk for about 30 metres
- Turn right into the next possible street. There is a small square and the second house should be a conbini
- Walk straight, the street should go up a slope towards the end. You have to walk for a couple of minutes
- Almost at the end of the street, the café will be at your right hand side.
Please be advised that you are not allowed to take photos from within the area if you don't order anything.
Freitag, 6. Juni 2014
Korea, Busan: Geumjeongsan Mountain (금정산)
(This post gives you information about Geumjeong, a mountain located north of Busan and worth a visit.
This spot is famous for its fortress wall and the gates you can visit and a temple.
There are two ways of reaching the top:
1. Using the hiking trail, that leads you through the temple and towards the gate. I have not used the hiking trail so for detailed information please refer to the official Korean tourism site.
2. Using the cable car. You will still have to walk a bit to reach the south gate. Also the path is not safe for buggies and make sure to wear proper foot wear if you plan on starting your hiking trip from the cable car.
To get to the cable car from the station is actually not very tricky if you follow the right signs. As for all places in Korea, the best way of finding your way is you use the Naver Map as it works a lot better than Google Maps. If you cannot read Hangul it's a bit more difficult but it proved to be the most reliable source of information.
Here is the route to get from the station to Geumgang Park, where the cable car is located. If you want to look it up yourself, type 온천장막썰어횟집 (Oncheonjang) as your departure and 금강공원 (Geumgang Park) as your destination.
It will take you around 20minutes from the station to the cable car. The good thing is, that you can see the cable car almost all the time, so even if you don't find the right crossing, you can still see it and try walking towards it.
So, how to get there:
1. Take the train to Oncheonjang Station (온천장막썰어횟집)
2. Take Exit 1 and turn left and walk straight for a while until you reach the next big intersection with traffic lights.
3. Turn right, cross the street, walk straight
4. At the next 5-way intersection, walk straight.
5. At the next bigger intersection, take the street at the most left side, it will lead half left.
6. Walk straight for about 10 minutes, up a hill until you reach a 3-way intersection where you cannot walk straight anymore. You have reached Geumgang Park.
7. To your right you can cross the street and enter the Park.
8. Take the center road, it will lead you up a hill through the park for a couple of minutes until you will reach the cable car.
Once you'r§ up, you might want to follow the actual hiking trail for a bit.
For example, you can follow the sign towards the south gate. If you follow it correctly, it will take around 20-30 minutes at most to reach that point.
1. When you leave the cable car turn right, towards the toilet.
2. Take the left road towards "South Gate" and keep right until you reach the top.
3. Turn right, pass the small toilet house and downhill up until you come to a crossing.
4. Turn left downhill and walk for a bit
5. There is a small crossing with one path leading downhill and the right path straight. Take the right path. If you can read hangul, the sign will tell you to walk straight but this will actually only lead you to a small town, not to the gate.
6. Follow the small path until you reach a house, pass that hous up the hill
7. Turn left and walk straight towards the South gate.
This spot is famous for its fortress wall and the gates you can visit and a temple.
There are two ways of reaching the top:
1. Using the hiking trail, that leads you through the temple and towards the gate. I have not used the hiking trail so for detailed information please refer to the official Korean tourism site.
2. Using the cable car. You will still have to walk a bit to reach the south gate. Also the path is not safe for buggies and make sure to wear proper foot wear if you plan on starting your hiking trip from the cable car.
To get to the cable car from the station is actually not very tricky if you follow the right signs. As for all places in Korea, the best way of finding your way is you use the Naver Map as it works a lot better than Google Maps. If you cannot read Hangul it's a bit more difficult but it proved to be the most reliable source of information.
Here is the route to get from the station to Geumgang Park, where the cable car is located. If you want to look it up yourself, type 온천장막썰어횟집 (Oncheonjang) as your departure and 금강공원 (Geumgang Park) as your destination.
It will take you around 20minutes from the station to the cable car. The good thing is, that you can see the cable car almost all the time, so even if you don't find the right crossing, you can still see it and try walking towards it.
 | ||
|
So, how to get there:
1. Take the train to Oncheonjang Station (온천장막썰어횟집)
2. Take Exit 1 and turn left and walk straight for a while until you reach the next big intersection with traffic lights.
3. Turn right, cross the street, walk straight
4. At the next 5-way intersection, walk straight.
5. At the next bigger intersection, take the street at the most left side, it will lead half left.
6. Walk straight for about 10 minutes, up a hill until you reach a 3-way intersection where you cannot walk straight anymore. You have reached Geumgang Park.
7. To your right you can cross the street and enter the Park.
8. Take the center road, it will lead you up a hill through the park for a couple of minutes until you will reach the cable car.
Once you'r§ up, you might want to follow the actual hiking trail for a bit.
For example, you can follow the sign towards the south gate. If you follow it correctly, it will take around 20-30 minutes at most to reach that point.
1. When you leave the cable car turn right, towards the toilet.
2. Take the left road towards "South Gate" and keep right until you reach the top.
3. Turn right, pass the small toilet house and downhill up until you come to a crossing.
4. Turn left downhill and walk for a bit
5. There is a small crossing with one path leading downhill and the right path straight. Take the right path. If you can read hangul, the sign will tell you to walk straight but this will actually only lead you to a small town, not to the gate.
6. Follow the small path until you reach a house, pass that hous up the hill
7. Turn left and walk straight towards the South gate.
Korea, Seoul: How to use the subway
Seoul provides an extensive subway system which is very easy to use, once you know how to use it.
Knowing Hangul is definitely an advantage but not necessary as long as you stay within the metropolitan area.
Unfortunately, you cannot rely on a map on paper since those on the internet may be old and you cannot get them at the station.
So if you want to get from A to B you either need to use this website: Cyber station and memorize the transfer and destination points or you use a smartphone and install the app Subway Navigation.
The Subway Navigation app is very easy to use and provides you with all necessary information to guarantee a quick and easy transfer.
First you need to know how the subway works in general:
All lines have a number or a letter and a color. Each line has always has its own platform so basically all you need to do is follow the signs with the color of your line. If you have to transfer to another line, you will always have big signs on the floor or the wall painted in the color of your next line.
Don't get confused if your direction or actual destination is not shown, just follow the color for starters.
On most stations, there is one platform for both direction but in some stations platforms are opposite each other so it's best to always remember the final stop of the line you want to use so you know which direction to go to. If you don't know the final stop you will always have a map of that line down at the platform.
Also, don't get confused if you don't find the final stop when following the signs, as sometimes they will only show the next major station. In these cases, ignore the station names and just follow the color.
When in the subway, music will play whenever you reach a station where you can transfer to another line. On major stations announcements will be made in Korean, English, Japanese and Chinese and you will always have a display either at above the doors or in the center showing the next stop and transfer information in at least Korean and English.
Using the subway and transfering is much easier with the Subway Navigation app.
To use the app, open it and you will get the complete subway map. You can choose between a couple of cities, "Metropolitan" being Seoul. In the settings you can switch between Korean and English station names, choose whatever suits you best.
In this map, you first click on the station you want to depart. A context menu will open with different options such as "Departure", "Destination", "Add Favorite" and "View station info".
The last option will give you real time information about the next trains. This will only work if you have internet.
Choose "Departure" and then proceed to click on the station you want to get to and choose this as "Destination".
A new window will open showing the lines and transfer points.
Sometimes, there are different routes, so at the top left you can switch between the route that takes the shortest time and that needs the fewest transfers.
Next to that you can switch between Holiday and Workday and look for the first or last train on that route.
The next line shows the departue time. Per se this is always the current time. By clicking on the arrow you can choose a different time. Same goes for the field "Arrival" to set your desired time of arrival.
Then you see the actual route. It shows the start station and beneath that in smaller letters the final stop on that line. This is very important because this station shows you which direction you have to go.
Next to your start station you will see the color and number of the line you have to take and next to that the time of departure.
If you have to transfer, the next line will indicate something called "Quick transfer". This is very helpful because it shows you what wagon you have to get into in order to be closest to the stairs that will get to you to the next train. The wagon number is also always located in front of the doors at the platform so you can already go there.
This line will also show you how many stops you have to take and how long it will take.
And from then on the same information will repeat with the next transfer until the last line containing the destination station and the time of arrival, the duration and the fare.
For more information about using the Subway Navigation App, go to the Android Play store.
As for tickets, I suggest you buy the T-Money card upon entering Korea, since this will give you one less thing to worry about when traveling by subway. You can use the card in all major cities.
If you go to Busan and plan on using the bus system there, I advise you to get a card provided by the Hu Metro, which is the local subway provider.
If you don't want to buy the T-Money card you can always by individual tickets for every trip.
All you have to do is go to a "Ticket Vending and Card Reload Device".
Select your language.
Click the left button to buy a single fare ticket.
Choose your destination. Destinations are sorted alphabetically.
Enter the number of passengers you want to buy tickets for.
Pay the amount shown on the screen.
Wait for a moment, then receive the credit card sized tickets.
Go through the security gate by placing your ticket at the security card reader and exit at your destination the same way.
Once you exit through the security gate, look for a machine called "Deposit Refund Device". Put your single ticket into the machine and receive the 500Won deposit.
Buying individual tickets seems more expensive at first but you will get a 500Won deposit when returning the ticket. Still, I recommend buying the prepaid T-Money card or one of the other available passes, especially if you plan on using the public transportation system for a couple of days.
You can find information about how to get a subway ticket for Seoul subway at the Official Korean tourism site
Knowing Hangul is definitely an advantage but not necessary as long as you stay within the metropolitan area.
Unfortunately, you cannot rely on a map on paper since those on the internet may be old and you cannot get them at the station.
So if you want to get from A to B you either need to use this website: Cyber station and memorize the transfer and destination points or you use a smartphone and install the app Subway Navigation.
The Subway Navigation app is very easy to use and provides you with all necessary information to guarantee a quick and easy transfer.
First you need to know how the subway works in general:
All lines have a number or a letter and a color. Each line has always has its own platform so basically all you need to do is follow the signs with the color of your line. If you have to transfer to another line, you will always have big signs on the floor or the wall painted in the color of your next line.
Don't get confused if your direction or actual destination is not shown, just follow the color for starters.
On most stations, there is one platform for both direction but in some stations platforms are opposite each other so it's best to always remember the final stop of the line you want to use so you know which direction to go to. If you don't know the final stop you will always have a map of that line down at the platform.
Also, don't get confused if you don't find the final stop when following the signs, as sometimes they will only show the next major station. In these cases, ignore the station names and just follow the color.
When in the subway, music will play whenever you reach a station where you can transfer to another line. On major stations announcements will be made in Korean, English, Japanese and Chinese and you will always have a display either at above the doors or in the center showing the next stop and transfer information in at least Korean and English.
Using the subway and transfering is much easier with the Subway Navigation app.
To use the app, open it and you will get the complete subway map. You can choose between a couple of cities, "Metropolitan" being Seoul. In the settings you can switch between Korean and English station names, choose whatever suits you best.
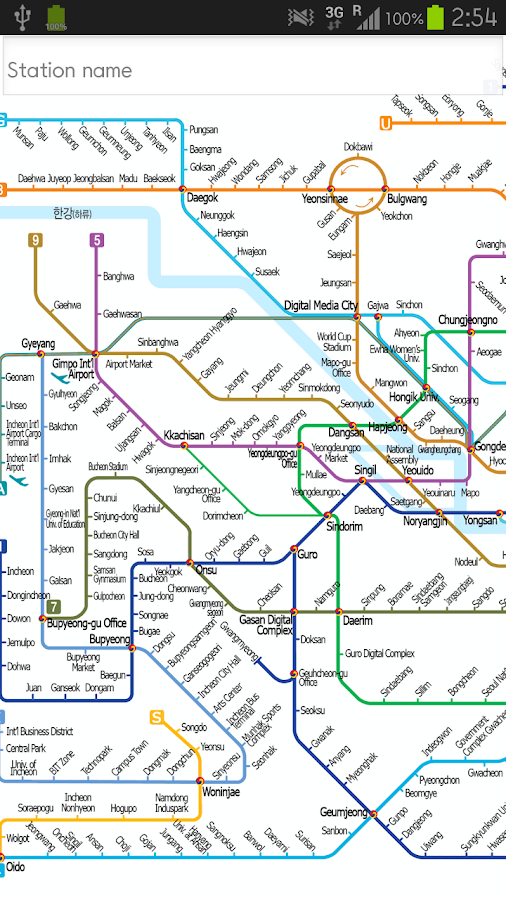 |
| Source: https://play.google.com/store/apps/details?id=net.orizinal.subway |
The last option will give you real time information about the next trains. This will only work if you have internet.
Choose "Departure" and then proceed to click on the station you want to get to and choose this as "Destination".
A new window will open showing the lines and transfer points.
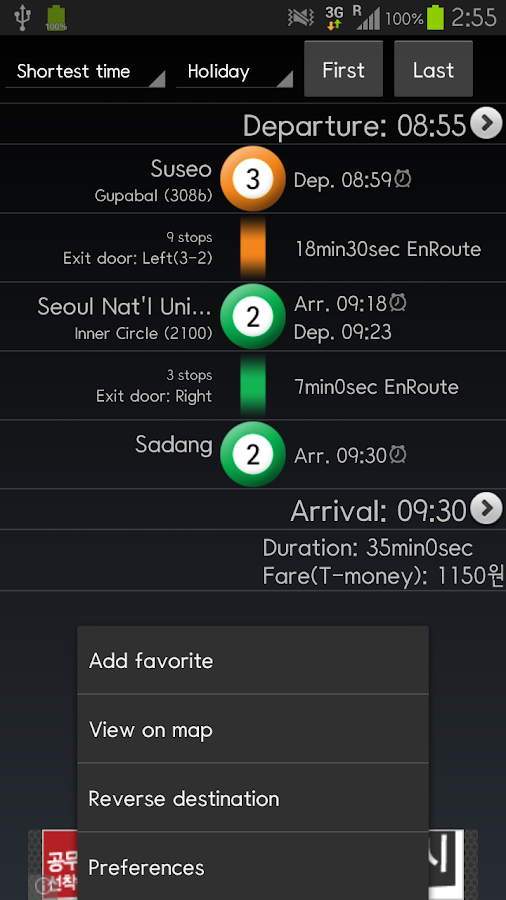 |
| Source: https://play.google.com/store/apps/details?id=net.orizinal.subway |
Next to that you can switch between Holiday and Workday and look for the first or last train on that route.
The next line shows the departue time. Per se this is always the current time. By clicking on the arrow you can choose a different time. Same goes for the field "Arrival" to set your desired time of arrival.
Then you see the actual route. It shows the start station and beneath that in smaller letters the final stop on that line. This is very important because this station shows you which direction you have to go.
Next to your start station you will see the color and number of the line you have to take and next to that the time of departure.
If you have to transfer, the next line will indicate something called "Quick transfer". This is very helpful because it shows you what wagon you have to get into in order to be closest to the stairs that will get to you to the next train. The wagon number is also always located in front of the doors at the platform so you can already go there.
This line will also show you how many stops you have to take and how long it will take.
And from then on the same information will repeat with the next transfer until the last line containing the destination station and the time of arrival, the duration and the fare.
For more information about using the Subway Navigation App, go to the Android Play store.
As for tickets, I suggest you buy the T-Money card upon entering Korea, since this will give you one less thing to worry about when traveling by subway. You can use the card in all major cities.
If you go to Busan and plan on using the bus system there, I advise you to get a card provided by the Hu Metro, which is the local subway provider.
If you don't want to buy the T-Money card you can always by individual tickets for every trip.
All you have to do is go to a "Ticket Vending and Card Reload Device".
Select your language.
Click the left button to buy a single fare ticket.
Choose your destination. Destinations are sorted alphabetically.
Enter the number of passengers you want to buy tickets for.
Pay the amount shown on the screen.
Wait for a moment, then receive the credit card sized tickets.
Go through the security gate by placing your ticket at the security card reader and exit at your destination the same way.
Once you exit through the security gate, look for a machine called "Deposit Refund Device". Put your single ticket into the machine and receive the 500Won deposit.
Buying individual tickets seems more expensive at first but you will get a 500Won deposit when returning the ticket. Still, I recommend buying the prepaid T-Money card or one of the other available passes, especially if you plan on using the public transportation system for a couple of days.
You can find information about how to get a subway ticket for Seoul subway at the Official Korean tourism site
Korea, Seoul: T-Money Card
The best way to get around with public transportation is by using the T-Money card. It's a prepaid card that allows you to use the subway and buses within Seoul and a couple of other cities within South-Korea. You can also use it to pay in certain convenience stores.
The T-Money card comes in different kinds and shapes, the standard being a card the size of a normal credit card. You can also find shapes for your key chain or phone chain, always depending on where you buy it.
How to get a T-Money card? It's actually very easy as you can really buy it in almost any convenience store. On the internet it says that you are to look out for the T-Money sign but that is not always true. It's best to look for a convenience store in or near a station, go to the counter and ask the clerk for a T-Money card. They will then either give you one or send you to another store that does have a card.
The easiest way is probably to go to a store right at the airport as I am sure they have those cards there or at least know where to get them.
The card costs 5000Won and apparently you can get it refunded when you leave the country.
Once you bought the card, you need to charge it first. To do so, all you have to do is go to the station and look for a machine that says "Ticket Vending and Card Reload Devices".
First you choose your language and then click on the menu item at the right side.
Place you card at the recharging pad.
At the next menu, choose the amount you want to recharge. One trip in Seoul is about 1050Won - 1150Won for an adult.
Pay the amount and wait until recharging is done.
To use the card, just place it at the security card reader when entering and exiting. You will see two numbers at the screen. The number at the top indicates how much this trip will cost you, the number at the bottom shows you how much money you have left on your card.
If you try to enter although you don't have enough money, you will get an error and the security gate will close. You will then have to recharge your card first.
If you try to leave and you do not have enough money left on your card, you will also get an error and the security gate will close. But not worries, there are always recharge machines next to the gates inside the station where you can recharge as well.
More detailed information about the T-Money card and other cards and pictures are found at the official site of Korea tourism.
Abonnieren
Kommentare (Atom)